Clear
Channel Ranger AR3500
Documentation Project
CBTricks.com
OPERATION
|
Once
installed, your transceiver is ready to use. The frequency range is
preset at 28.000 to 29.999.9 MHZ and the radio automatically scans in
100 Hz increments. Basic operation using these pre-established Settings
is described below. The Ranger provides the flexibility to change these settings, scan only your favorite frequenci~5 saved in memory, and use the split frequency feature. These advanced methods of operation also are described in this section. NOTE:
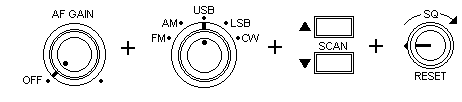
1. Turn on the backup voltage power. (Turn the RESET control clockwise until you hear a click.) 2. Turn on the transceiver power. (Turn the AF GAIN control clockwise until you hear a click.) 3. Turn the mode selector to the operating mode you want to use (FM, AM, USB, LSB, CW). 4.
Press the UPPER SCAN switch to scan the full frequency range
from its lower limit (28.000.0) to the upper limit (29.999.9). Press
the LOWER SCAN switch to scan the frequency range from its upper
end to the lower end. 5. If the radio does not begin scanning immediately, adjust the SQ (squelch) control clockwise until the frequency display begins to change. Use SQ to silence background noise; turn the control clockwise until the noise disappears. This also reduces the Ranger's ability to receive weaker frequencies. To pick up more frequencies, turn SQ counterclockwise.
Variations on Basic Scanning Change
Scanning Increment:
Change
Frequency Range: 1.
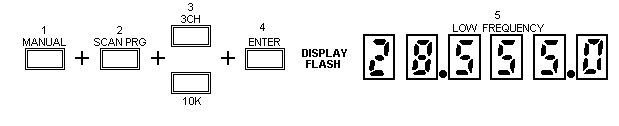
Press the MANUAL button. (If the transceiver was scanning when
you pressed this button, the scanning stops.) 2.
Press SCAN PRG. 3.
Using the momentary switches below the frequency display, enter the
scanning increment you want to use (e.g., 100 Hz, 1K, 10K). You must
enter the scannin9 increment before setting the frequency range. Be
sure to press the upper switch. 4. Press ENTER. The frequency display will flash once. 5.
Enter the desired lower end frequency using the momentary switches.
Each switch corresponds to the LED (light emitting diode) above it.
Press the upper momentary switch to increase the number, press the lower
switch to decrease the displayed number. The display will change as
you enter each number. HELPFUL
HINT: If the frequency you want to enter is greater than the one
currently displayed, it is best to enter the numbers from right to left.
If the desired frequency is lower than the one currently displayed,
work from left to right. 6.
Press ENTER. The display will flash. 7.
Enter the upper end of the frequency range you want to set using the
same switches as described in step 5. 8. Press ENTER. The frequency display will flash twice. 9. Press upper or lower scan button to sail scanning.' 10.
If you wish to delete a certain frequency from within the scanning range
selected, simply press the cancel switch while
Enter
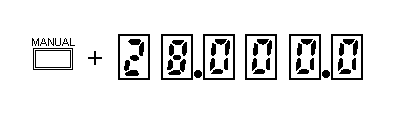
a Specific Frequency: 1. Press MANUAL. 2. Use the momentary switches to enter the frequency. Each switch corresponds to the LED above it. Press the upper switch to increase the displayed number; press the lower switch to decrease the number.
Using
the Memory Storing
a Frequency in Memory: 1. Press MANUAL. 2. Enter the desired frequency using the momentary switches. Each switch corresponds to the LED display above it. Press the upper switch to increase the displayed number; press the lower switch to decrease the number. 3. Press ENTER. The display flashes once. 4. Press the upper switch for the channel (CH1, CH2, ... CH5) to correspond with this frequency. 5. Press ENTER again. The display flashes twice and the channel LED flashes once.
6. Repeat steps 2 through 5 for each frequency you want to save in memory.
There are two methods to scan the frequencies you have saved in memory: manual or automatic. 1.
Press MANUAL. 2. Turn SQ counterclockwise, but not off. 3.
Press MEMORY. Each time you press this button, the radio scans to the
next channel in numerical order (i.e., channel 1, channel 2, etc.).
If you have not assigned frequencies to all five channels, the radio
scans only those channels that have been assigned a frequency.
To manually scan memory:
1.
Press MANUAL. 2.
Press MEMORY once. 3. Turn SQ clockwise until the transceiver beings to scan the channels automatically. The frequency display will change and the channel LEDs will light briefly as each saved frequency is scanned. The Ranger always scans the frequencies saved in memory in numerical order according to the channel number (i.e., channel 1, channel 2, etc.). 4. To stop automatic scanning, turn SQ counterclockwise or press MANUAL. To automatically scan memory:
Cancel a Frequency Saved in Memory: If
you have saved a frequency and assigned it to a specific channel, you
also can cancel it. Once canceled, it is no ionger saved in the transceiver's
memory. To cancel a channel: 1. Press MANUAL. 2. Manually scan to the frequency you want to cancel using the MEMORY button. 3.
Press CANCEL.
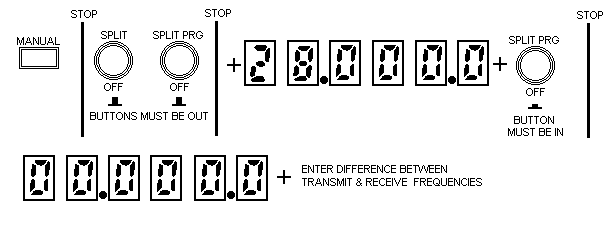
Change a Channel Frequency: You can change the frequency assigned to any channel by simply overwriting the previous frequency. Follow the same steps described above under Storing a Frequency in Memory. The channel will then be assigned the new frequency instead of the old one. Split Frequency Operation You can transmit and receive on different frequencies and preset the frequencies you want to use. Once set, the Ranger automatically goes to the transmit frequency when the PTT button is pressed. When the PTT button is released, the transceiver goes to the receive frequency. Preset the Receive and Transmit Frequencies: 1. Press MANUAL. 2. Make sure that the SPLIT, SPLIT PRG, and + / - buttons are out. 3.
Enter the receive frequency using the momentary switches. Each switch
corresponds to the LED display above it. Press the upper switch to increase
the displayed number; press the lower switch to decrease the number. 4. Push the SPLIT PRG button in. The frequency display will change to all zeros (0). NOTE: If you have previously programmed split frequency operation, the last split you entered will be displayed (instead of zeros) when you press SPLIT PRG. 5.
Enter the difference between the receive and transmit frequencies using
the momentary switches on the front panel.
1. Turn SPLIT PRG off. Button should be out. 2. Turn SPLIT on. Button should be in and the SPLIT LED on the front panel will light. 3.
Press + / - in if the transmit frequency will be higher than the receive
frequency. The button should be out if the NOTE:
The transceiver will not allow a transmit or receive frequency that
is higher or lower than the upper limits of 4. Press the PTT button on the microphone to talk, release to receive. The transceiver displays the transmit frequency when the button is pressed and the TX LED on the front panel will light. When the button is released, the transceiver displays the receive frequency and the RX LED on the front panel will light.
NOTE: If you change the displayed frequency while using split frequency operation, the new frequency becomes your receive frequency. When you press the PTT button to transmit, the transceiver splits from the current frequency instead of the one you entered when you programmed split frequency operation. 5. To discontinue split operation, release the SPLIT button (out position). The SPLIT LED will go out. |


Disclaimer: Although the greatest care has been taken while compiling these documents,
we cannot guarantee that the instructions will work on every radio presented.
Please join the CB Tricks E-Mail group and send a message if you discover a problem.